Pages

Monday, February 27, 2012

Exploring Cricut: Movie challenge


Welcome to the last challenge of February! This was a very tricky challenge for me and I flip-floped many times before settling on the project I submitted.

The challenge for this week was to create a layout, card, or other paper craft on the theme of show business. Wow! Diane is really making us think out of the box on this one. Considering everyone I've shown the project to has needed an explanation I guess I either went too far out of the box, or I wasn't successful in making a connection to the theme. I like to think I just went too far out of the box, but I'll let you decide. Explanation will be at the bottom. Now to the project. Once again I decided to do a card (I know you all are surprised).

Base is white daisy 5x7 (CTMH)
Cardstock: Twilight 5x7 (CTMH)
Arch: desert sand, white daisy, new england ivy (CTMH)Bloom Arch:4.65x4.53, flowers 3.48x4.53
You're Invited:White Daisy, Alphalicious 1"
Ranger Stickles: Pink
Sparkles (CTMH)

OK: Now for my explanation. I am a big Twilight fan so I decided to do my "show business" with that movie series. The inspiration for the card of course came from Edward and Bella's wedding from Breaking Dawn, the quote is from Edward's toast to Bella at their reception, and of course the color of cardstock for the background: Twilight. The last part was an afterthought after I determined the rest of the card. The only thing I can say in my defense is I couldn't help myself, I'm addicted to these characters! Go Team Edward!!!


Breaking Dawn: Twilight, Gypsy font 1"
Movie Night: Twilight, Gypsy font 1"
Turquois Stickles: Ranger
Saturday, February 25, 2012

Exploring Cricut: Daily Project for 2/25


Hello one and all! This has been a busy couple of weeks with a lot of good and bad happening. One great things that is coming up this summer is a member of my church is getting married. Not really one to go to weddings (too depressing for your's truely), but I do believe they need to be celebrated. Mom and I were invited to a shower, so I decided to create the bridal shower card.


The base is white daisy 5.5x4.25
elemental pattern paper 5.25x4
Heavenly Blue heart and M
Cotton Candy heart and A
Hearts are 2.43x2.06
Initials are 2.99x2.76
The hearts were cut using Sweethearts cartridge, and the initials were cut using Calligraphy Collection.

I tried to intertwine the hearts and letters to symbolize the joining of two hearts in marriage. Not sure that shows up in the picture, but I'm pleased with the result! Since I did the hard part, Mom now gets to write on the inside.
thanks for viewing my project and have a blessed week!
Saturday, February 18, 2012

February Card Class


This month began a new catalog season with Close To My Heart, and like always I was so excited to start creating with the new papers and images. I started off with the Stella paper and Fashonista stamp set. I threw in some of the Just For You stamp set as well.
Card #1 Recipe
Base: 5.5x4.25, White Daisy
Pattern Paper: 5.25x4, Stella
Lagoon 4.25x2.5, cornerns rounded
Sunset 3.75x2.25, corners rounded
I stamped the lady onto a piece of colonial white using cocoa ink and cut around, then on another piece of colonial white I stamped her again in sunset. I cut out her outfit and handbag and adhered them to the cocoa image then adhered to the card. Finish it off with a new pewter badge button.
Card #2 Recipe


Base:5.5x5.5, White Daisy
cardstock: 5.25x5.25, cocoa
5x2.5, sunset
4.75x2.25, colonial white
Pattern paper: 5.25x.5, Stella (Lagoon flower)
white embossing powder
bitty sparkles
I used the store stamp from the Fashionista set and embossed it using the white embossing powder. I also embossed the saying. Then adhere the .5 strip and the sunset cardstock.


I stamped one lady using cocoa ink then stamped her again in Lagoon. I cut the handbag out of the stamped Lagoon image and adhered it to the cocoa image. This was then adhered to the sunset cardstock. To add some interest I added 3 tiny sparkles to her handbag and one to the center of her belt.


Card #3 Recipe

Base: 5.5x4.25, white daisy
cardstock: 5.25x4, large cocoa
4x2.25, small cocoa
pattern paper: 5x3.75, Stella (tulip)
3.75x2, Stella (Lagoon flower)
scallop circle: 2.75, olive
circle: 2.25, colonial white
chocolate and colonial white striped grosgrain ribbon
I stamped the staying from the Fashionista set in olive on the colonial white circle.


Card #4 Recipe

Base: 5.5x4.25, White Daisy
Pattern paper: 3x4, Stella (dress pattern)
.5x4, Stella (Lagoon flower)
1.75x4, Stella (multi)
Image: Just for you stamp set
outline stamped in cocoa, 3 petals stamped in sunset with a touch of tulip on the top, 3 petals in lagoon with a touch of olive on the top. Two leaves stamped in olive.
Wooded button in the center of the flower and twine tied on the fold.


Card #5 Recipe

Base: 5.5x4.25, White Daisy
Pattern Paper: 4x2, Stella (red)
4x.5, Stella (multi)
Image: Just for you stamp set
I stamped the dotted outline in cocoa, the petals are stamped in sunset, and the leaves are stamped in 2nd generation olive. I stamped the saying in sunset and added an orange button.
Wednesday, February 15, 2012

Heart 2 Heart Challenge Entry


I love this card so much I decided to enter it in this weeks Heart 2 Heart Challenge. This weeks challenge was to use 1 stamp (which is a real challenge to limit myself) 2 pattern papers, and 3 embellishments.


Here's my take on the challenge.

1 stamp: thanks from the Thank you set

2 pattern papers yellow dot and pink squares from the Mayberry line.

3 embellishments: pink sparkles for the antennae, cream opaques foro the eyes, and the yellow/blue ribbon.

The butterfly comes from the Cricut cartridge Create a Critter.


Thanks for viewing my project!
Monday, February 13, 2012

Sweets Challenge


Welcome everyone to another great challenge from Exploring Cricut. For this challenge we could make a card, layout, or other paper craft using candies, sweets, love, hearts, etc. It doesn't have to be limited to Valentine's day.
Once again I decided to make a card. I started with a white base that 5.5x5.5. I cut a piece of heart paper from the Sweetheart line 5.25x5.25.
My cricut cuts are:
Desert sand: flower pot 4.66x8.65 using Everyday Pop-Up Cards
pear: leaves 2" using Celebrate with Flourish
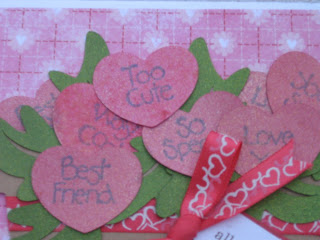
Smoothie and Baby Pink: hearts 1" using Baby Steps


White Daisy: 2" tag from Art Philosophy

To make things interesting I spritzed the leaves with limolicious and Emerals Smootch and the hearts with cherry ice, pink sprinkles, and vanilla shimmer.
For anyone who hasn't worked with the smootch spritz or similar products they are super easy and the effect you get is worth the drying time. Pick your favorite color or the color that will work best with your project. Shake the tube well since the fun part settles to the bottom. Hold the tube about 6 inches from your project and spritz.


Spritz a little for a cool look or spritz a lot for a more complete coverage. The leaves really turned out the best. As you can see the spritzed leaves are a new color with tons of shading.


For the hearts, after I had spritzed them with the smootch and let them dry, I stamped them with sayings from an old Close to my Heart stamp set to make them into "Conversation Hearts". I adhered ribbon to my flower pot and tied a pretty bow for the tag. The ribbon is just a seasonal ribbon I found at Wal-Mart. Once the flower pot was adhered to the card I started to layer the hearts and leaves to make it look as close to a plant as possible. I have to admit the final product turned out tons better than I thought it would!


I then cut the tag and adhered it to a piece of tulip cardstock. I then stamped the saying with a phrase from the Pair-a-Phrase set in chocolate ink.

Saturday, February 11, 2012

Daily Project: Thanks


Welcome to the Exploring Cricut daily project for today. For today's project I decided to make a card (I know you're surprised). You can never have too many thank you cards so I decided to make one for my stash! This one is pretty straight forward although there is some cutting. I started with a card base that was 5.5 x 4.25, for this card the base is bamboo. I then cut a piece of honey patterned paper that was 5.25 x 4 and wrapped it with a scrap piece of ribbon from my stash. Once I had adhered this to the card base I was ready for the Cricut. I cut the butterfly using Create a Critter. I made the following cuts
Butterfly W= 5.02, H= 3.47 (I actually made this cut twice using 2 different pattern papers)
outline 5.02x3.47 (smoothie cardstock)
body 5.02x3.47 (olive cardstock)

The two pattern papers that the butterfly was cut from, I cut the wings off and using the outline as my guide I trimmed enough for the wings.

Once everything was put together I stamped "thanks" in chocolate ink using the Thank You set, put pink sparkles on the antenna, and two opaques for the eyes.

Recipe:
cardstock: bamboo, smoothie, olive (CTMH)
pattern paper: all from Mayberry (CTMH)
ribbon: from stash
sparkles, opaques (CTMH)
Thank you stamp set (CTMH)
ink: Chocolate (CTMH)

That's it for my super simple card. Hope you enjoy this project, thanks for stopping by, and have a stupendous Saturday!